Tips & Workflows: Multi-Stage Application Drafting
The LLM Sandbox can draft every component of a patent application: claims, figures, and all sections of the specification. The “Draft — Patent Application” mode, combined with the Figure modes and Custom Prompt Library, gives you the tools to produce a complete application. But how you organize the work matters as much as the tools themselves.
The approach that works best (in my experience) is to treat application drafting as a pipeline of stages. Each stage starts from a clean conversation and consumes only the finalized artifacts it needs as context files. Here’s the general shape:
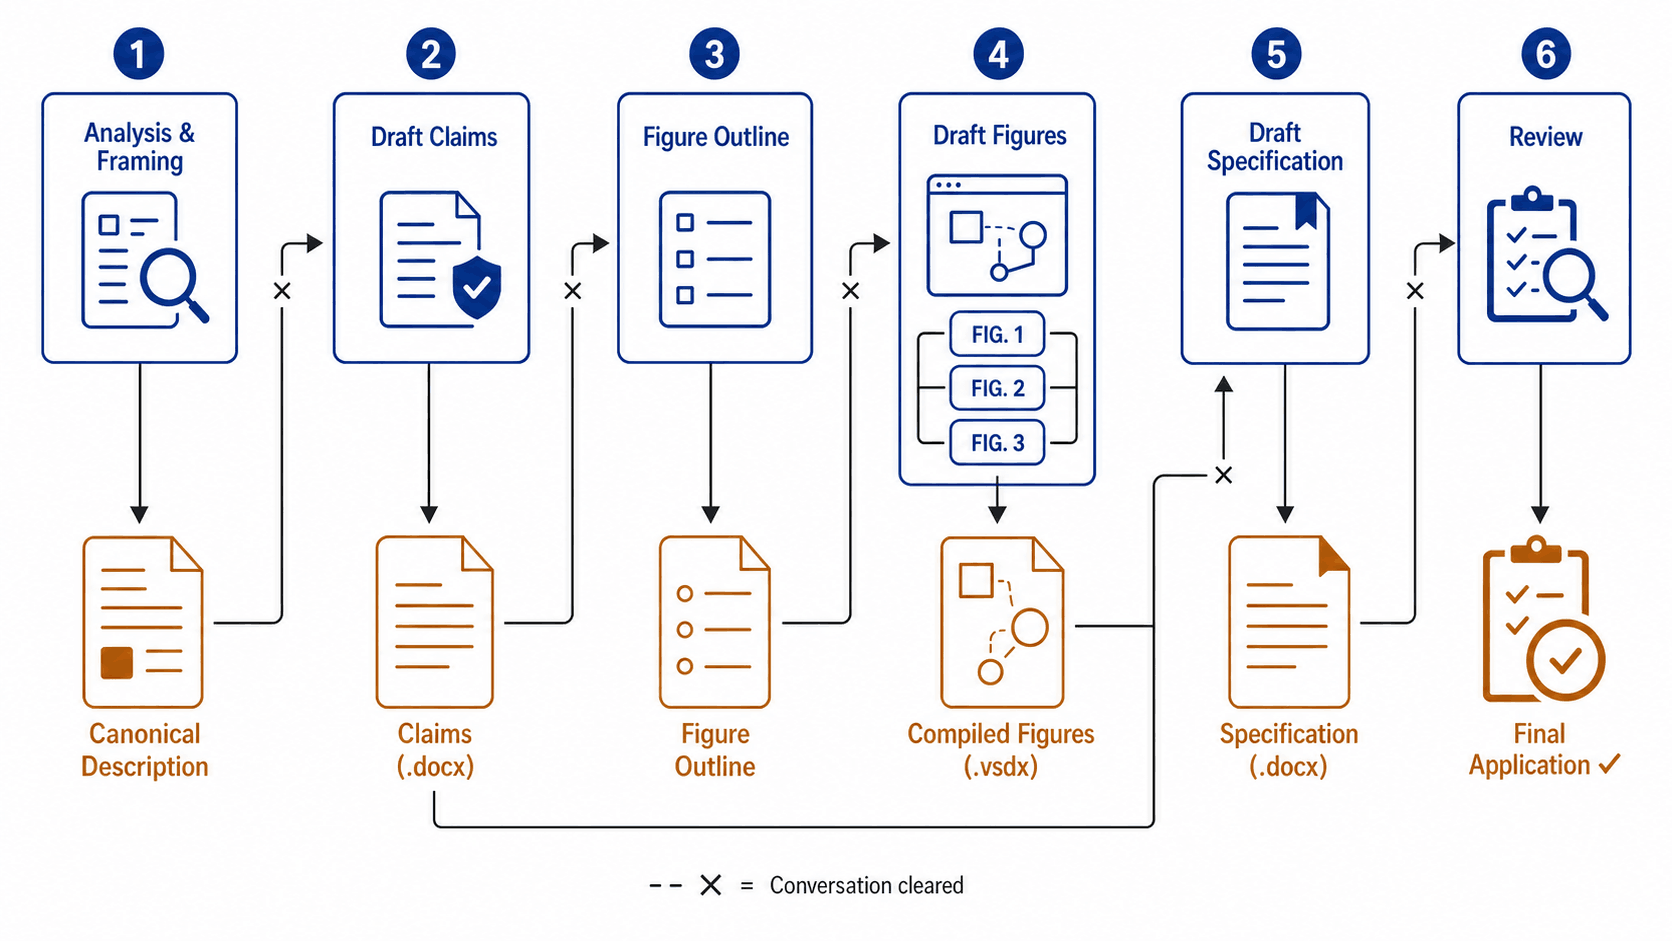
Stage 1: Analysis & Framing
Before drafting anything, I use the Sandbox to analyze the invention disclosure and produce what I call a “canonical invention description”: a structured framing document that captures the core inventive concepts, the strategic positioning, and the key distinctions that will drive the rest of the application. This document becomes the foundation for everything downstream.
This stage deserves its own deep dive, and we’ll cover it in a future issue.
Stage 2: Draft Claims
Starting a fresh conversation with the canonical description (and usually the original disclosure) uploaded as context, I draft the claims. The output is a .docx file containing the claims in draft specification format.
This is probably the stage that requires the most critical thinking and direct input from you. Expect a decent amount of back and forth here: refining scope, adjusting claim structure, ensuring the claims precisely reflect your strategic vision for the application. The LLM can generate claims quickly, but converging on claims you’re actually happy with takes iteration and judgment.
This is also where the Custom Prompt Library pays dividends. You can build specialized claim-drafting prompts for different technology areas, different clients, or different claim strategies, and select the appropriate one at the start of each matter. The prompt encodes your preferences and approach; the context files provide the substance.
Once claims are finalized, this is a natural point to run N-Spec for antecedent basis checking, art unit targeting, and 101 eligibility analysis, before investing time in figures and specification.
Stage 3: Figure Outline
Next I generate a figure outline: a structured plan describing what each figure will depict, what components appear in each, and how the figures relate to the claims. This is its own conversation (clean slate, claims uploaded as context), and I often use a dedicated custom prompt for the claims-to-outline conversion.
The outline is a lightweight artifact, but it’s an important one. It gives you a chance to review and adjust the figure plan before investing time in generating the actual figures. If the outline includes components or connections you don’t want, you catch that here rather than after you’ve already generated five figures.
Stage 4: Draft Figures
With the outline and claims as context, I draft the figures themselves using the Figure modes. Each figure is generated in its own conversation. Once I’m satisfied with a figure, I download it, make any manual adjustments, and add it to a compiled drawings file (typically .vsdx or .pptx) that accumulates all figures for the application.
A note on parallelism: Because each figure is generated from the same outline and claims (and generally doesn’t depend on the other figures), this stage lends itself to parallel work. You can have multiple figure conversations running simultaneously, each producing a different figure from the same inputs. Or you can work in series but clear the conversation after each figure to keep things fast and token-efficient.
Stage 5: Draft Specification
With finalized claims and a compiled figures file in hand, I start drafting the specification sections. This stage uses “Draft — Patent Application” mode with the claims, figures, and (sometimes) the original disclosure uploaded as context.
This is typically where I switch from the web browser version of the Sandbox to the Word add-in. The add-in has a live view of your Word document via “Include Working Document Text,” so you never need to manually re-upload your draft as it grows. You can clear the conversation, keep working in the same document, and the Sandbox always sees the current state of the spec.
The specification doesn’t need to be drafted in a single conversation. I typically draft a few sections, then clear the conversation and continue with the next batch. Because the add-in always has the live document, clearing the conversation costs you nothing; you’re just shedding irrelevant history.
Stage 6: Review
The final stage is a fresh-eyes review of the complete draft. This is done in a clean conversation with no prior history: just the finished application uploaded as context. The absence of conversation history is the point. The reviewing LLM has no memory of the decisions, compromises, or iterations that produced the draft. It sees only the final product, which is exactly what you want for catching inconsistencies.
This stage is complemented by N-Spec, which runs automated checks for antecedent basis errors, figure/specification consistency, literal support for claim limitations, parts list accuracy, and other mechanical issues that are easy to miss on manual review.
Why This Approach Works
There are several reasons this staged approach produces better results than drafting in a single long conversation. They’re all somewhat related, and they reinforce each other.
1. It prevents drift and cascading errors
When you draft an entire application in one long conversation, every intermediate decision remains visible to the LLM. If you iterated on the figure outline, changed your mind about a component name, or restructured a claim during drafting, those earlier (now-superseded) versions are still in the conversation history. The LLM may reference them. It may get confused about which version is current. It may produce output that’s internally consistent with an earlier draft but inconsistent with your final figures.
By producing a finalized artifact at each stage and starting fresh, you eliminate this ambiguity entirely. The compiled figures file is the figures. There’s no earlier version in the conversation to compete with it.
This matters because it is always harder to fix a problem than to prevent one. A specification that references a component you removed from FIG. 3 during manual editing will cost you time and attention to track down and correct. A specification that never saw the pre-edit version of FIG. 3 won’t have that problem in the first place.
2. It reduces token consumption (and cost)
The Sandbox does some intelligent parsing of conversation history to filter out irrelevant content before sending it to the LLM. But this parsing itself takes additional time and costs additional tokens. A long conversation with extensive back-and-forth about claims, followed by figure planning, followed by specification drafting, means more content to parse through on every single prompt, even if not all of it ultimately gets sent. This is slow and expensive.
Starting each stage from a clean conversation with only the relevant context files means less parsing overhead and a more focused context window. The Sandbox’s context retrieval system (which semantically searches your uploaded files for the most relevant portions) also works best when it isn’t competing with conversation history for the LLM’s attention.
3. It enables modularity
Because each stage simply consumes input artifacts, those artifacts can come from anywhere. You could:
- Draft claims by hand and use the Sandbox only for figures and specification.
- Have a colleague produce the figure outline and use the Sandbox to generate the actual figures.
- Use a different tool or process for any stage, and still feed its output into the Sandbox for subsequent stages.
- Reuse the same claims and figures across multiple specification drafts (e.g., trying different levels of detail or different structural approaches).
The stages are decoupled. This makes the overall workflow robust and flexible in ways that a single-conversation approach can’t be.
4. Custom Prompts make each stage repeatable
The Custom Prompt Library lets you encode your approach for each stage as a reusable prompt. A claim-drafting prompt for software inventions. A different one for mechanical devices. A claims-to-outline conversion prompt. A detailed-description prompt that matches a particular client’s preferred style. Each stage becomes a repeatable, consistent process rather than something you reinvent each time.
Updates & Changelog
- TMEP knowledge base added. The Trademark Manual of Examining Procedure is now available as a built-in knowledge base, accessible via the Context panel checkbox alongside the MPEP, PCT, and SME knowledge bases. This should work better (and be easier to use) than manually uploading the TMEP as a context file. We know many patent practitioners also handle trademark matters; this update means more of that work can be done in the Sandbox. If you encounter any issues with the new TMEP knowledge base after using it a few times, let us know.
If you’ve developed your own staged workflows, custom prompts for specific drafting tasks, or other approaches you’d be willing to share in a future issue, I’d like to hear about them. — Will